Brief Summary
In this project I built an app capable of receiving an image, looking though a database of images and returning images similar to the uploaded image. You can try out the app or check out its code on my github.
The technology behind this app could easily be modified into a feature which will be very useful as a recommendation system on e-commerce websites, social media applications or any tech solution which relies on images for a major part of its functionality.
Lightbulb Moment
The first time I thought about visual similarity was when I was putting together an image dataset for my car classification project. I had built a web scraper capable of scraping images, checking for duplicates and deleting duplicated instances of an image. However, a particular interesting challenge remained, as anyone who has ever worked with raw data knows, raw data is never all the way clean. Since I was scraping images from online car retail sites, dirty images presented themselves in form of car interiors, car rear views or some variation of a placeholder image which always read 'pictures coming soon'.
The vast majority of these images were quite similar and at that point I had wished there was a way I could filter all images similar to a particular dirty image instance and remove them all form the dataset in one go. I resulted to randomly going through the images, grabbing a dirty instance, passing it to the duplicate checker method and deleting it along with all other instances of itself if it was duplicated. It was an arduous task but it got the job done eventually.
Well turns out its quite possible to filter all images similar to a particular image via a concept called Visual Similarity and yes you've probably guessed it, it does involve deep learning. Visual Similarity entails passing images through a neural network which serves as a feature extractor then comparing extracted features via cosine similarity so as to derive a similarity score between said images.
The Feature Extractor
Whilst building my Car Classifier I had trained a convolutional neural network which could classify cars as either Sedan, Coupe, SUV or Truck (Pickup Truck) to an accuracy of 95%. Its safe to say this convnet is pretty decent at extracting distinguishing features from cars so it made sense that if I wanted to do something on visual similarity it would be for cars as I had a neural network which could do the job already. The original architecture for this convnet is shown below.
class CarClassifier (nn.Module):
  def __init__(self):
    super().__init__()
    self.conv1 = nn.Conv2d(3, 32, 3)
    self.conv2 = nn.Conv2d(32, 32, 3)
    self.conv3 = nn.Conv2d(32, 64, 3)
    self.conv4 = nn.Conv2d(64, 64, 3)
    self.conv5 = nn.Conv2d(64, 128, 3)
    self.conv6 = nn.Conv2d(128, 128 ,3)
    self.conv7 = nn.Conv2d(128, 128, 3)
    self.fc1 = nn.Linear(8192, 514)
    self.fc2 = nn.Linear(514, 128)
    self.fc3 = nn.Linear(128, 4)
    self.pool2 = nn.MaxPool2d(2,2)
    self.pool4 = nn.MaxPool2d(2,2)
    self.pool7 = nn.MaxPool2d(2,2)
    self.batchnorm_conv1 = nn.BatchNorm2d(32)
    self.batchnorm_conv2 = nn.BatchNorm2d(32)
    self.batchnorm_conv3 = nn.BatchNorm2d(64)
    self.batchnorm_conv4 = nn.BatchNorm2d(64)
    self.batchnorm_conv5 = nn.BatchNorm2d(128)
    self.batchnorm_conv6 = nn.BatchNorm2d(128)
    self.batchnorm_conv7 = nn.BatchNorm2d(128)
    self.batchnorm_fc1 = nn.BatchNorm1d(514)
    self.batchnorm_fc2 = nn.BatchNorm1d(128)

  def forward(self, x):
    x = x.view(-1, 3, 100, 100).float()
    x = F.relu(self.batchnorm_conv1(self.conv1(x)))
    x = self.pool2(F.relu(self.batchnorm_conv2(self.conv2(x))))
    x = F.relu(self.batchnorm_conv3(self.conv3(x)))
    x = self.pool4(F.relu(self.batchnorm_conv4(self.conv4(x))))
    x = F.relu(self.batchnorm_conv5(self.conv5(x)))
    x = F.relu(self.batchnorm_conv6(self.conv6(x)))
    x = self.pool7(F.relu(self.batchnorm_conv7(self.conv7(x))))
    x = torch.flatten(x,1)
    x = F.relu(self.batchnorm_fc1(self.fc1(x)))
    x = F.relu(self.batchnorm_fc2(self.fc2(x)))
    x = self.fc3(x)
    return F.log_softmax(x, dim=1)
This convnet returns a 4 dimensional vector as output, specifically designed for a 4 class classification task. In order to modify this network into a feature extractor, I removed the final layers leaving the output of the first linear layer as extracted features. This layer outputs a 512 dimensional vector, enough elements (in my opinion) to provide a diverse set of features for each image instance. The modified convnet, now feature extractor, is shown below.
class CarClassifier(nn.Module):
  def __init__(self):
    super().__init__()
    self.conv1 = nn.Conv2d(3, 32, 3)
    self.conv2 = nn.Conv2d(32, 32, 3)
    self.conv3 = nn.Conv2d(32, 64, 3)
    self.conv4 = nn.Conv2d(64, 64, 3)
    self.conv5 = nn.Conv2d(64, 128, 3)
    self.conv6 = nn.Conv2d(128, 128 ,3)
    self.conv7 = nn.Conv2d(128, 128, 3)
    self.fc1 = nn.Linear(8192, 514)
    self.fc2 = nn.Linear(514, 128)
    self.fc3 = nn.Linear(128, 4)
    self.pool2 = nn.MaxPool2d(2,2)
    self.pool4 = nn.MaxPool2d(2,2)
    self.pool7 = nn.MaxPool2d(2,2)
    self.batchnorm_conv1 = nn.BatchNorm2d(32)
    self.batchnorm_conv2 = nn.BatchNorm2d(32)
    self.batchnorm_conv3 = nn.BatchNorm2d(64)
    self.batchnorm_conv4 = nn.BatchNorm2d(64)
    self.batchnorm_conv5 = nn.BatchNorm2d(128)
    self.batchnorm_conv6 = nn.BatchNorm2d(128)
    self.batchnorm_conv7 = nn.BatchNorm2d(128)
    self.batchnorm_fc1 = nn.BatchNorm1d(514)
    self.batchnorm_fc2 = nn.BatchNorm1d(128)

  def forward(self, x):
    x = x.view(-1, 3, 100, 100).float()
    x = F.relu(self.batchnorm_conv1(self.conv1(x)))
    x = self.pool2(F.relu(self.batchnorm_conv2(self.conv2(x))))
    x = F.relu(self.batchnorm_conv3(self.conv3(x)))
    x = self.pool4(F.relu(self.batchnorm_conv4(self.conv4(x))))
    x = F.relu(self.batchnorm_conv5(self.conv5(x)))
    x = F.relu(self.batchnorm_conv6(self.conv6(x)))
    x = self.pool7(F.relu(self.batchnorm_conv7(self.conv7(x))))
    x = torch.flatten(x,1)
    x = F.relu(self.batchnorm_fc1(self.fc1(x)))
    return x
This feature extractor takes in a 3 channel 100 pixel by 100 pixel image which essentially has 30,000 (3x100x100) elements and produces a 512 element representation of its feature map. Might sound ridiculous but turns out a lot of information is actually encoded into that comparatively small output vector. Next I simply loaded the weights I had trained for the convnet (for car classification) and just like that I went from having a convnet which is great at extracting features from cars and classifying them accordingly, to a convnet which is simply great at only extracting features.
#  loading model weights
model = CarClassifier()
model.load_state_dict(torch.load('car_classification.pt', map_location=device))
Prototyping
This section is a bit code heavy as expected, feel free to move unto the next section if you like as I'll try to repeat myself in a less technical way there.
Loading Images
To derive random images from the car image dataset, I had to write a function to that effect. This function would return a list with each element of the list being a list of its own. The inner lists would contain the loaded image in numpy array format and the image filename (more on this later).
#  defining function
def load_images():
  """
  This function loads 2000 random images from each directory
  """
  dir =  {
          'sedan': 'gdrive/My Drive/Datasets/Car_Images/sedans',
          'coupe': 'gdrive/My Drive/Datasets/Car_Images/coupes',
          'suv': 'gdrive/My Drive/Datasets/Car_Images/suvs',
          'truck': 'gdrive/My Drive/Datasets/Car_Images/trucks'
          }

  all_files = []
  selected_files = []
  loaded_images = []

  print('deriving filenames')
  for key, value in tqdm(dir.items()):
    files = os.listdir(value)
    all_files.append(files)

  print('selecting random files')
  for file_list in tqdm(all_files):
    np.random.shuffle(file_list)
    selected = file_list[:2000]
    selected_files.extend(selected)

  print('loading images')
  for f in tqdm(selected_files):
    #  deriving filepath
    if 'sedan' in f:
      path = os.path.join(dir['sedan'], f)
    elif 'coupe' in f:
      path = os.path.join(dir['coupe'], f)
    elif 'suv' in f:
      path = os.path.join(dir['suv'], f)
    elif 'truck' in f:
      path = os.path.join(dir['truck'], f)

    #  loading image
    try:
      image = cv2.imread(path)
      image = cv2.resize(image, (100, 100))
    except Exception:
      pass

    #  saving to list
    loaded_images.append([image, f])

  return loaded_images

#  loading files
files = load_images()
files = [x for x in files if x[0] is not None]
Creating a Makeshift Image Database
Next, I needed to copy these randomly selected images in their regular file format to a different folder which will serve as the image database. I extracted filenames form the loaded images and wrote a function which would convert these filenames into filepaths. Afterwards, I wrote some code to copy these files into a directory of my choice.
def derive_filepaths(file_list):
  """
  This function derives image filepath
  """
  dir =  {
          'sedan': 'gdrive/My Drive/Datasets/Car_Images/sedans',
          'coupe': 'gdrive/My Drive/Datasets/Car_Images/coupes',
          'suv': 'gdrive/My Drive/Datasets/Car_Images/suvs',
          'truck': 'gdrive/My Drive/Datasets/Car_Images/trucks'
          }

  all = []

  for f in tqdm(file_list):
    #  deriving filepath
    if 'sedan' in f:
      path = os.path.join(dir['sedan'], f)
    elif 'coupe' in f:
      path = os.path.join(dir['coupe'], f)
    elif 'suv' in f:
      path = os.path.join(dir['suv'], f)
    elif 'truck' in f:
      path = os.path.join(dir['truck'], f)

    all.append(path)
  return all

#  extracting filenames
filenames = [x[1] for x in files]

#  deriving filepaths
filepaths = derive_filepaths(filenames)

#  copying images
destination = 'gdrive/My Drive/Datasets/Car_Images/similarity_images'
for i in tqdm(range(len(filepaths))):
  shutil.copy(filepaths[i], destination)
Feature Extraction
To extract features, I needed to preprocess the loaded images by scaling them and transforming them to tensors.
#  preprocessing image arrays into tensors
files = [[img/255, f] for img, f in files]
files = [[transforms.ToTensor()(img), f] for img, f in files]
Afterwards, features are extracted by passing images through the feature extractor convnet.
#  extracting features
model.eval()
with torch.no_grad():
  files = [[model(img), f] for img, f in tqdm(files)]
Similarity Scoring
To test out the visual similarity concept, I calculated the similarity scores of a random image against all other images in the 'files' variable, extracted scores and filenames into two separate lists, created a Pandas Series with the filenames as indices and the scores as values, sorted the Series, and assessed the similarity of the highest scoring images.
#  deriving similarity scores
similarity = [[F.cosine_similarity(files[4879][0], img).item(), f] for img, f in files]

#  extracting scores and filenames
scores = [x[0] for x in similarity]
f_names = [x[1] for x in similarity]

#  creating a series of scores and filenames
series = pd.Series(scores, index=f_names)
series = series.sort_values(ascending=False)
series.head(10)

>>>  suv_1101.jpg     1.000000
     suv_10223.jpg    0.845531
     suv_7371.jpg     0.804062
     suv_59839.jpg    0.794439
     suv_835.jpg      0.784851
     suv_13946.jpg    0.754294
     suv_64347.jpg    0.752008
     suv_55795.jpg    0.748010
     suv_12578.jpg    0.747605
     suv_52711.jpg    0.745200
The top 10 most similar images are displayed. Similarity scores range from 1 to 0 with 1 being a perfect score of 100% similarity. The highest scoring image is in-fact the same as the image which similarity scores were derived for hence the perfect similarity score.
Building the App
App Logic
The idea behind the app is to prompt users to upload an image of a car then recommend some other cars based on their similarity to the uploaded car. For this to work I needed some kind of 'database' of cars to look through so I simply selected 8000 images at random from my car image dataset, distributed evenly between all 4 car classes (2000 each), put them in a folder and this became my makeshift 'image database'.
While prototyping, I had realized that extracting features from 8000 images took quite some time and it would be performance inefficient if that is done each time an image is uploaded. Due to this, I decided to extract features from all images in my image database, save these features and their corresponding filenames in a list, then save this list as a pickle file which would be loaded and utilized each time an image is uploaded.
#  saving extracted features
with open('gdrive/My Drive/Datasets/similarity_features.pkl', 'wb') as f:
  pickle.dump(extracted_features, f)
On the other hand, computing cosine similarity scores was quite fast and is done whenever an image is uploaded. In the same vane, scores and filenames are saved in a list after which they are then extracted into two individual lists and used to create a Pandas Series with the filenames as index and the scores as values. The Series is sorted in descending order and the top 4 indices extracted as recommendations/similar images while their scores are extracted and formatted as captions. The highest similarity score is also derived to serve as a quick adversarial check.
App Anatomy
def save_image(img):
    #  saving uploaded image
    with open('image.jpg', 'wb') as f:
        f.write(img.getbuffer())
    pass


def compute_similarities(image):
    #  loading model state
    model = CarClassifier()
    model.load_state_dict(torch.load('app_files/model_state100.pt', map_location=device))

    #  loading image features
    with open('app_files/similarity_features.pkl', 'rb') as f:
        extracted_features = pickle.load(f)

    #  processing image
    img = cv2.imread(image)
    img = cv2.resize(img, (100, 100))
    img = img/255
    img = transforms.ToTensor()(img)

    #  extracting image features
    model.eval()
    with torch.no_grad():
        img = model(img)

    #  computing similarities
    similarity_scores = [[F.cosine_similarity(img, im).item(), f] for im, f in extracted_features]

    #  extracting scores and filenames
    scores = [x[0] for x in similarity_scores]
    filenames = [x[1] for x in similarity_scores]

    #  creating series of scores
    score_series = pd.Series(scores, index=filenames)
    score_series = score_series.sort_values(ascending=False)

    #  extracting recommendations
    recommendations = score_series.index[:4]
    recommendations = [os.path.join('images/similarity_images', f) for f in recommendations]

    #  creating captions
    labels = score_series.values[:4]
    labels = [round(x*100) for x in labels]
    labels = [f'similarity: {x}%' for x in labels]

    #  extracting  highest recommendation scores
    recommendation_check = score_series.values[0]

    #  deleting uploaded image
    os.remove('image.jpg')

    print(score_series.head(4))

    return recommendations, labels, recommendation_check
The functions above act as a sort of 'mainframe' for the app. Firstly, the save_image() function receives the uploaded image and saves it in the root directory, then the compute_similarities() function performs the following operations:
accepts the loaded image as argument.
loads the convnet weights.
loads the features extracted from all images in the database saved as a pickle file.
reads the uploaded image and preprocesses it accordingly.
extracts its features using the feature extractor.
computes the similarity of all images in the database to the uploaded image.
creates a sorted series of scores.
extracts the 4 highest indices (filenames) as recommendations.
turns the filenames into a filepath.
extracts the 4 highest similarity scores and formats them as captions.
derives the highest similarity score as an adversarial checker.
returns the recommendations, captions and the adversarial checker.
App Workflow
All of the above processes are then put together in an output function which performs some logic and displays recommendations, prompts and some feedback.
def output(uploaded):
    try:
        #  saving image
        save_image(img=uploaded)

        #  provide feedback
        st.write('##### Image uploaded!')

        #  display image
        st.image('image.jpg', width=365)

        #  derive recommendation
        recommended, captions, check = compute_similarities(image='image.jpg')

        #  feedback
        st.write('#### Output:')

        #  check recommendations
        if check < 0.50:
            #  feedback
            st.error(
                """
                Hmmm there appears to be no similar images in storage.
                Either that or this might be a unique looking car or not a car at all.
                Would you still be interested in seeing what the model thinks about this image regardless?
                Note however that the recommendations will be very dissimilar.
                """
            )

            #  receive user option
            option = st.checkbox('show me what the model thinks')

            if option:
                #  feedback
                st.success('Here are the most likely images...')
                #  displaying likely images
                st.image(recommended, caption=captions, width=300)

        else:
            #  feedback
            st.success('Here are some similar images...')
            #  displaying similar images
            st.image(recommended, caption=captions, width=300)

    except AttributeError:
        #  handle exception
        st.write('Please upload image')
    pass
App Performance
The app does quite well at finding similar images. Assessing its behaviour, it tends to look for chassis (car body shape) similarity first, not surprising as the underlying feature extractor is a modified form of a convnet trained to classify cars by chassis shape (car class). Next, the app looks for similarity in background, color or object orientation.
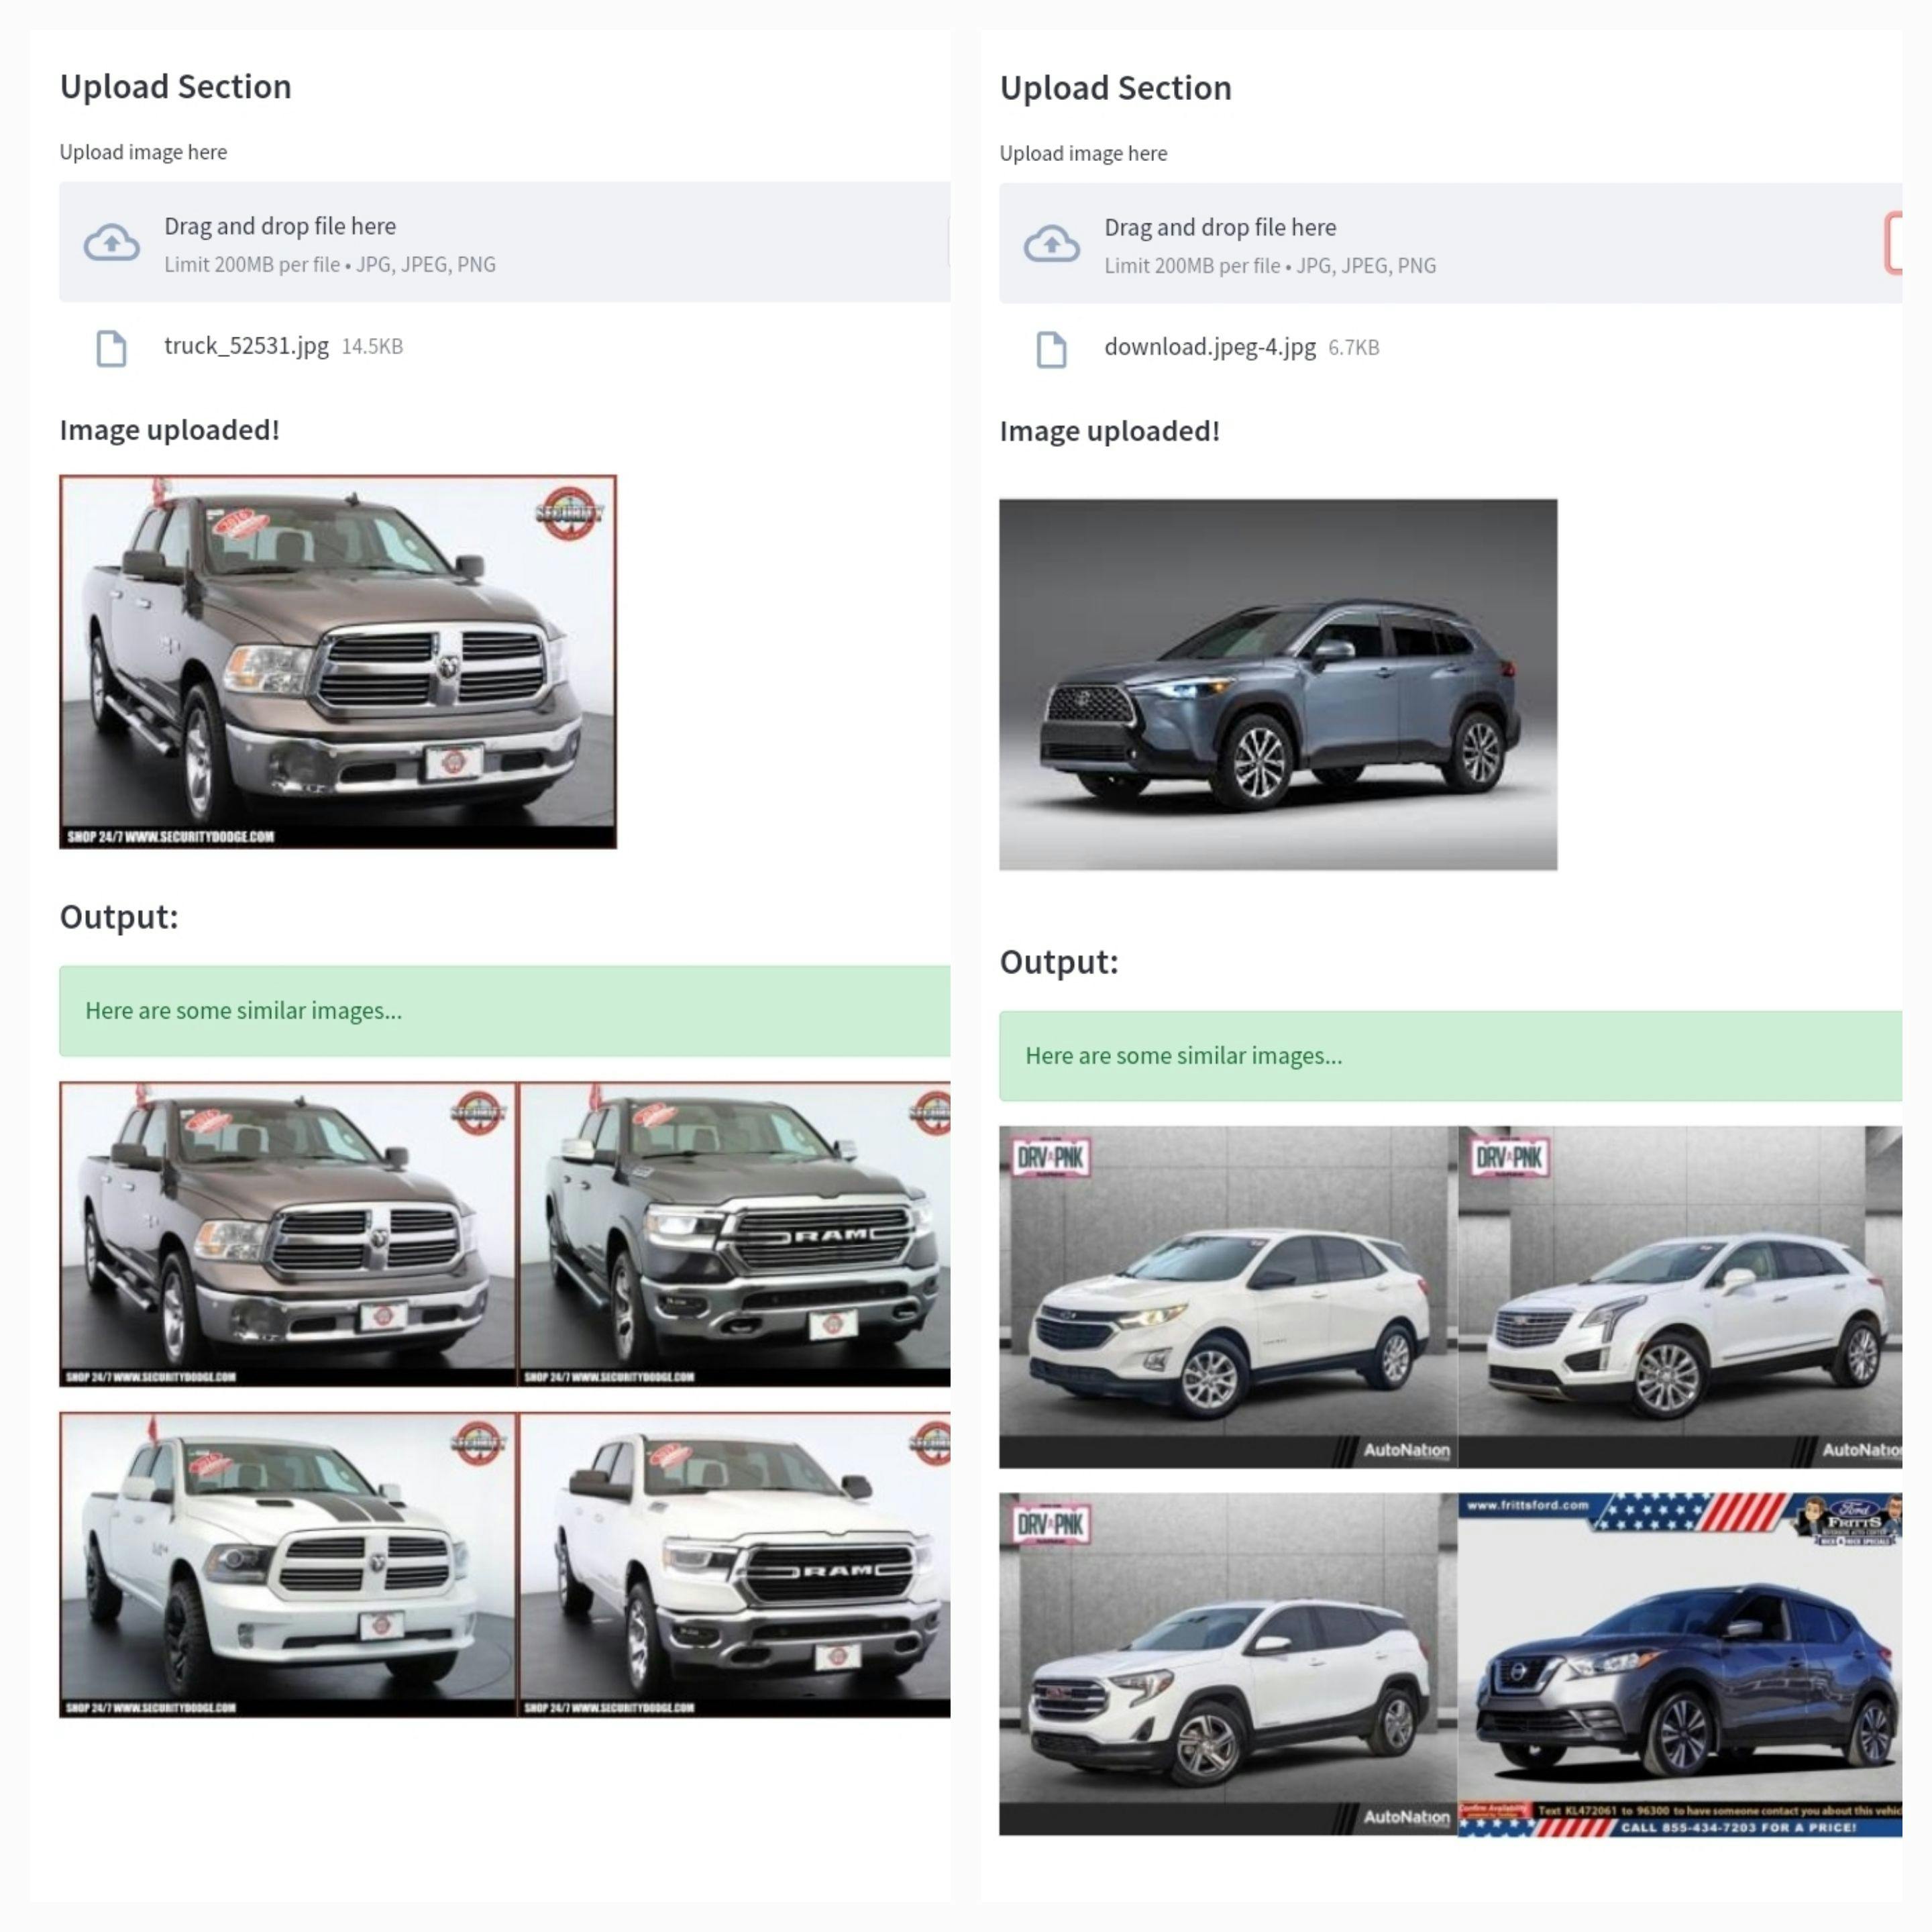
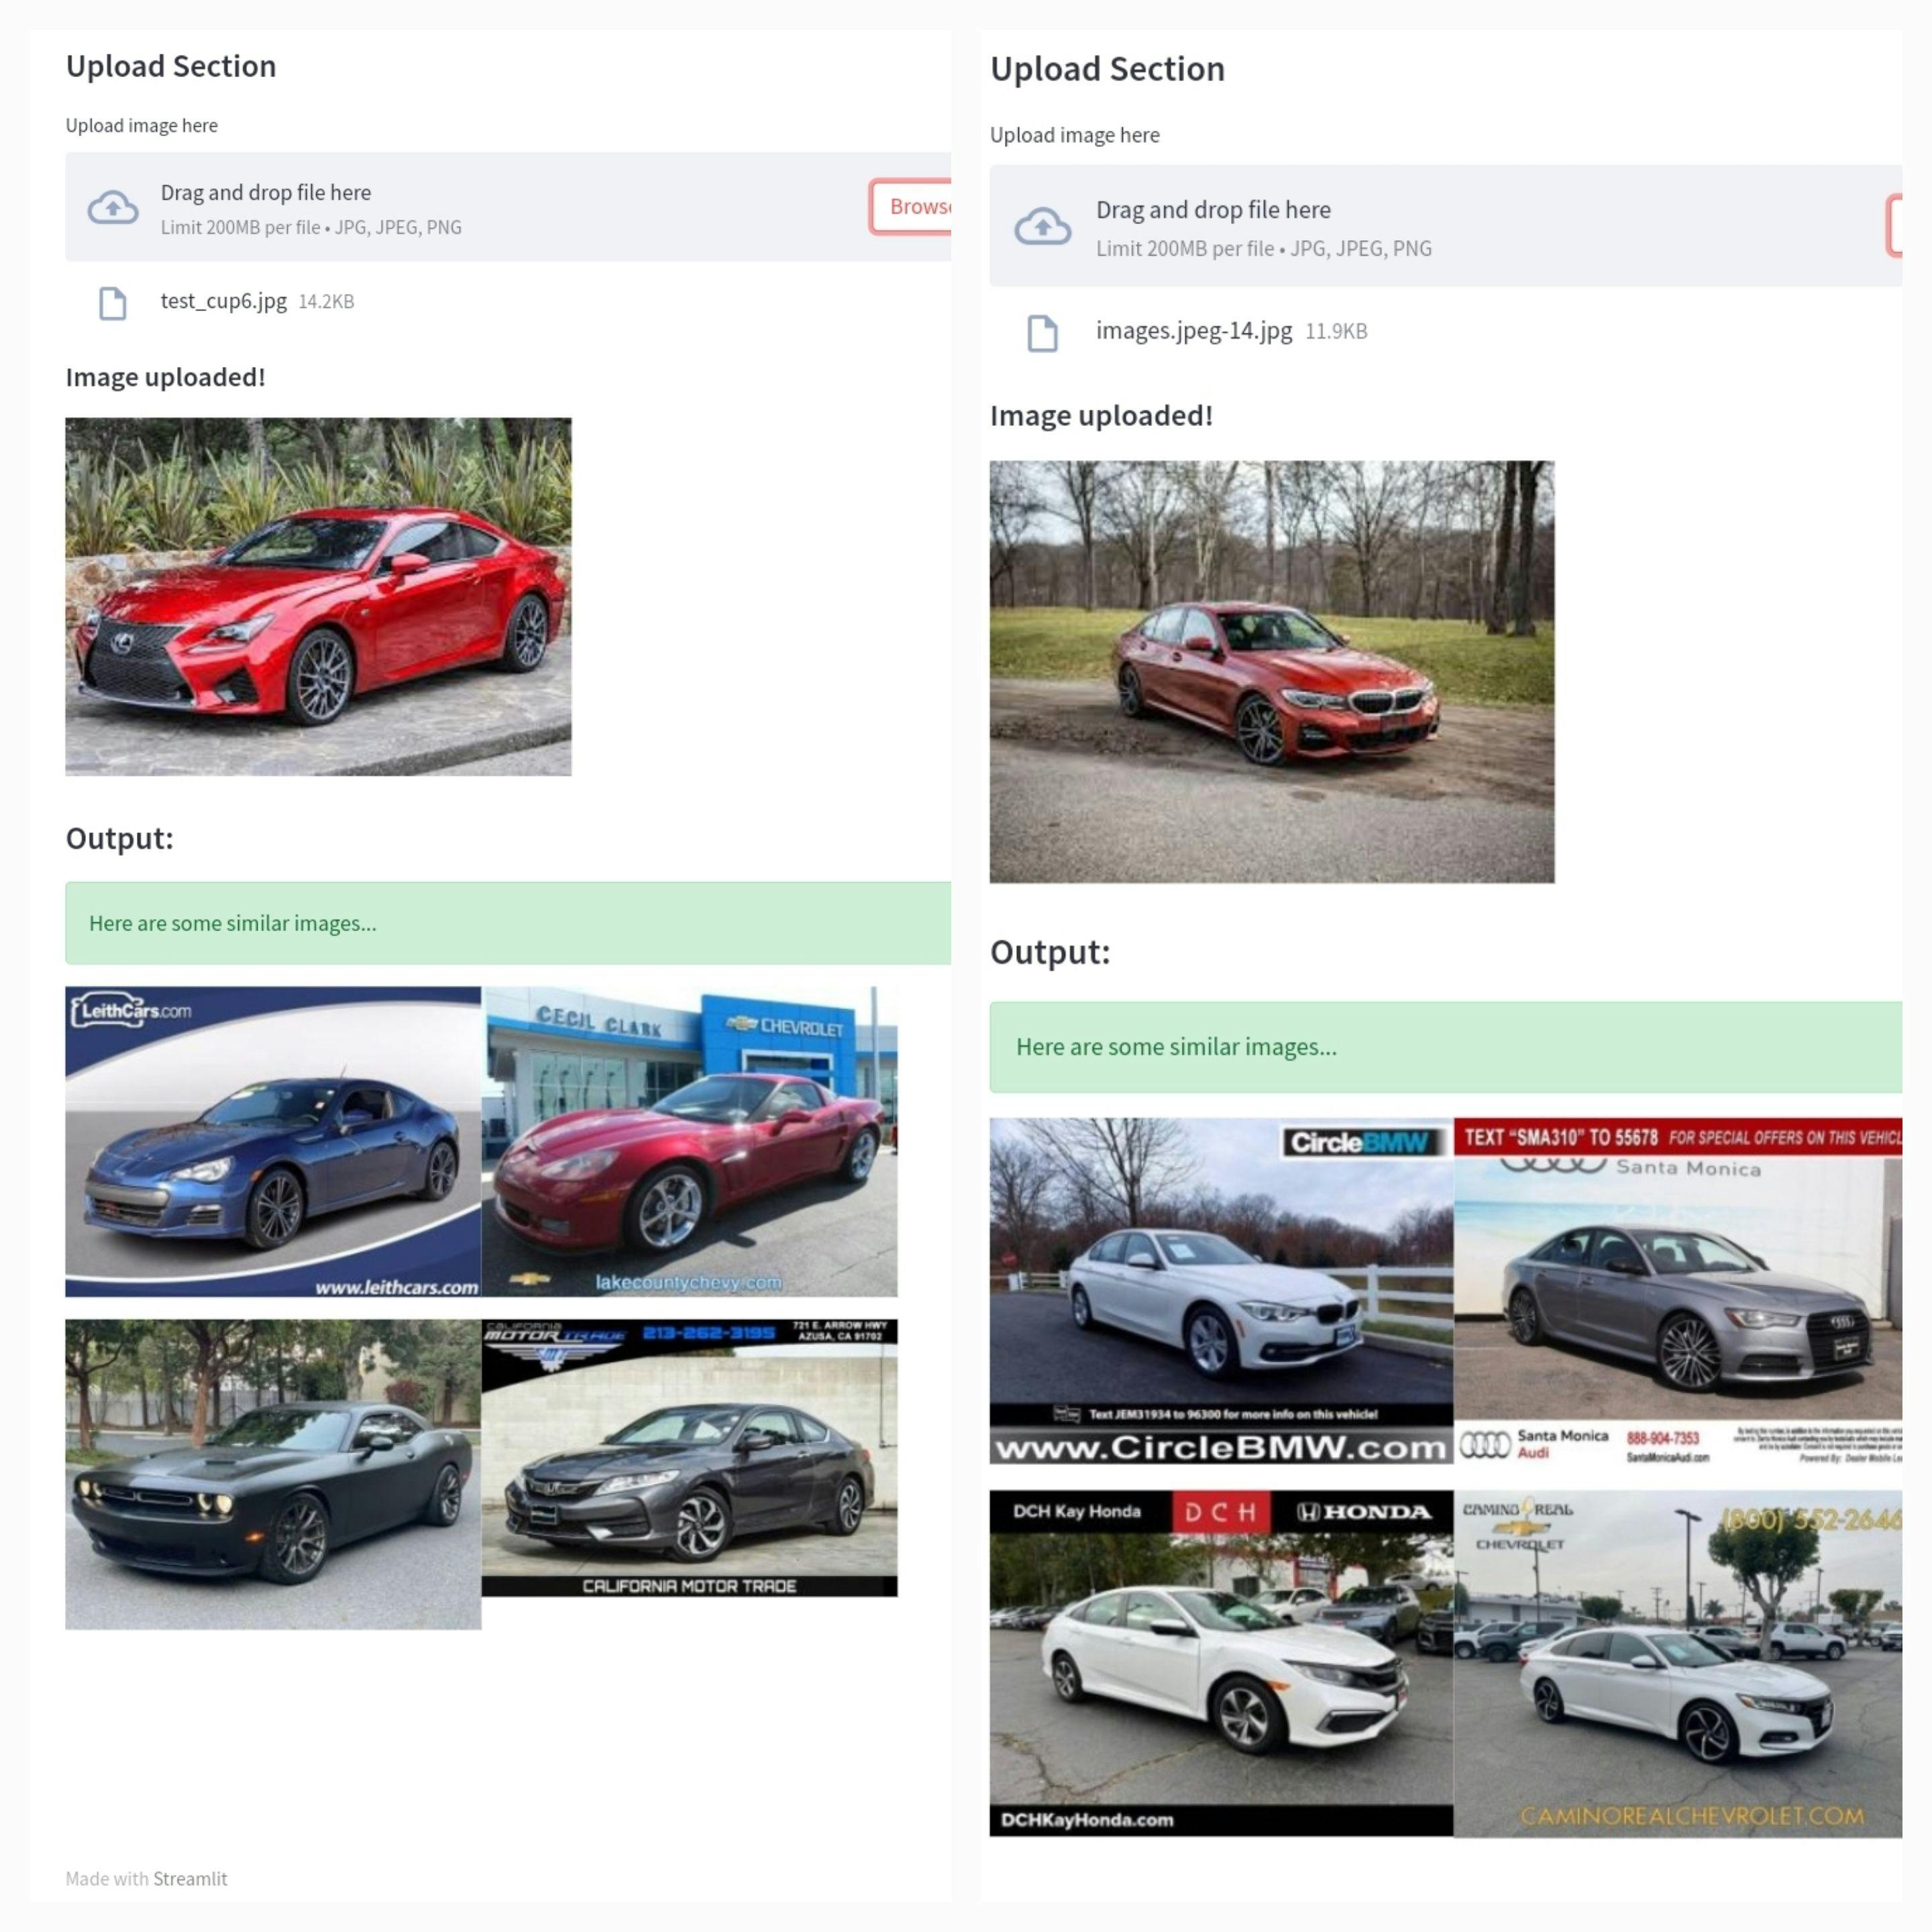
In the image below, the recommended images have similar chassis shapes and are all oriented the same way.

However, in the next image, for any recommended image where chassis shape might not be as close of a match, object orientation or image background are quite similar. The two uploaded images have an outdoor background and you'll notice that a number of the recommended images also have an outdoor background even though their chassis might differ slightly.

Handling Adversarial Attacks
What exactly are adversarial attacks? In a computer vision context an adversarial attack is when a user knowingly uploads an out of distribution image with the aim of deceiving the underlying neural network. Well in this particular case maybe not in a bid to deceive the network but rather to push its boundaries, sort of. For this app an adversarial attack would be knowingly uploading a non-car image. The thing about neural networks like the one which powers this app is that they overgeneralize, what this means is regardless of whatever image is uploaded, the convnet will extract features from it.
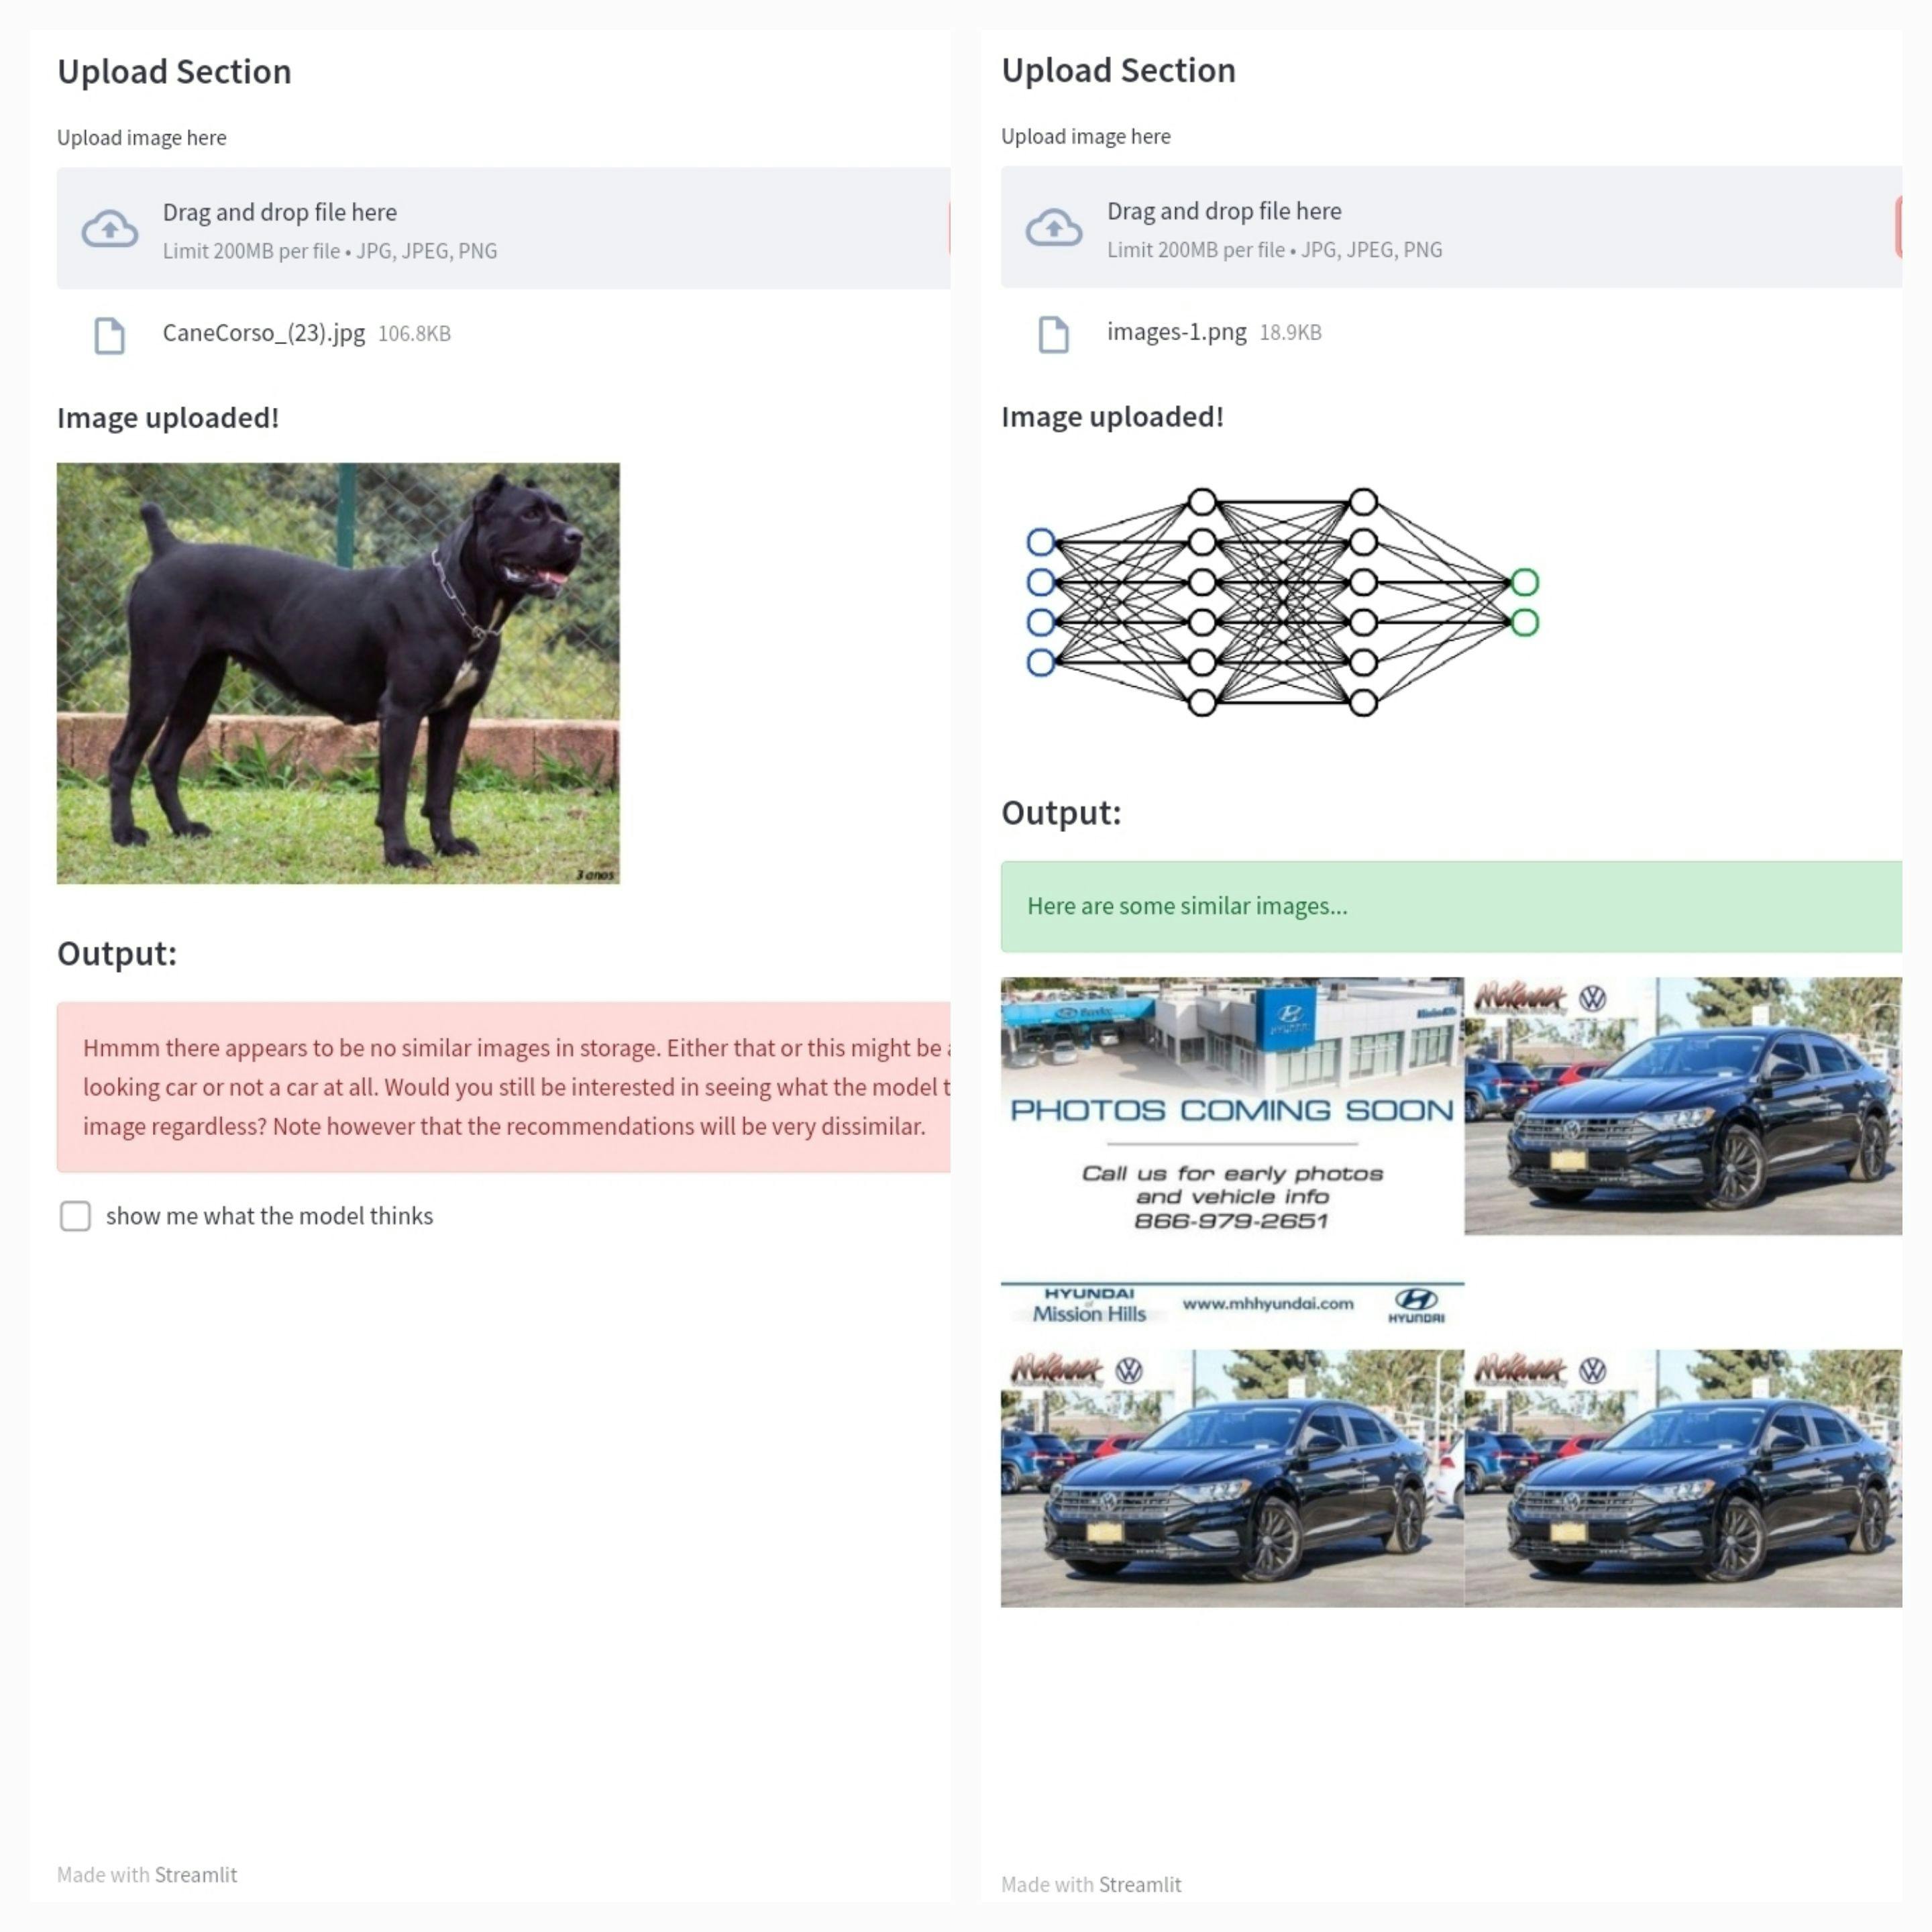
For instance, if an image of a camel is uploaded, the app will extract features from this camel as if it were a car, calculate similarity scores between the camel and all the cars in the database and tell you which cars look similar to this camel in some outlandish way PS the recommendations typically make zero sense and in most cases the app returns the images in the database with the most noisy features.
So how do I stop the app from being susceptible to these attacks? Remember the recommendation check returned in the compute_similarities() in the app anatomy section? This check represents the highest similarity score to the uploaded image so I used it as a sort of screen for uploaded images. While testing, I discovered that many adversarial images had low similarity scores to images in the database, usually less than than 0.5. I therefore specified that if the check is less than 0.5 then the image should be taken as adversarial. This worked in some instances and didn't work in others as seen below.
#  derive recommendation
        recommended, check = compute_similarities(image='image.jpg')

        #  feedback
        st.write('#### Output:')

        #  check recommendations
        if check < 0.50:
            #  feedback
            st.error(
                """
                Hmmm there appears to be no similar images in storage.
                Either that or this might be a unique looking car or not a car at all.
                Would you still be interested in seeing what the model thinks about this image regardless?
                Note however that the recommendations will be very dissimilar.
                """
            )

So for this project, at least for now the most effective way for me to handle adversarial attacks is to trust the users to not upload non-car images. I have some thoughts on managing adversarial attacks which I hope to put out soon.
Conclusion
Its honestly amazing how an image of 30,000 elements could be down-sampled into a 512 element vector representation of its features and it still retains a lot of its vital information. It retains this information well enough to a point where one could use these elements to match similar images by shape, background, orientation and even color. Deep learning remains ever amazing.
This was a particularly fun and sentimental project for me, as visual similarity was something I wished I could do when I was just getting stared in Computer Vision. Its quite satisfying to see that as I have grown in the field, my knowledge has begun to satisfy my curiosity.
If you have read this far, you are clearly intrigued by computer vision, deep learning or machine learning in general (Yh because this is quite a verbose piece haha). You are definitely someone I would love to interact with so please feel free to contact me on my social media or connect with me on LinkedIn.

